


INTRODUCCIÓN


Considero que todos absolutamente todos los electrónicos conocemos los interruptores horarios, mayormente estos dispositivos se utilizan en el sector de la agricultura, básicamente lo que hace es encender una electroválvula o un motor por un periodo de tiempo programado. Si bien es cierto, estos dispositivos funcionan bien. Sin embargo, la mayoría de estos equipos solo cuentan con una salida a relé. Entonces si se quiere implementar para 4 electroválvulas y dos motores se necesitaría 6 unidades de interruptores horarios. Por eso, en este video crearemos una tarjeta pcb que sea capaz de controlar 6 o más salidas desde una sola tarjeta y, que al mismo tiempo se pueda programar desde un celular.
ESPECIFICACIONES TÉCNICAS
- Tensión de alimentación……………………….…………24VDC
- Corriente de alimentación………………….……………80mA
- Reloj de tiempo Real…………………………………………….Extremadamente preciso
- Pantalla LCD…………………………………………………………..Sí (16×2)
- Programación Directa………………………………….….Ordenador o celular – RTC BOARD
- Entorno de programación………………………..……..Arduino IDE
- Condiciones ambientales min………………………….-10°
- Condiciones ambientales max…………………..…….80°
- Salida RELAY………………………………………………………4
- Tensión salida AC…………………………..….……220V
- Corriente AC………………………………………….5A
- Tensión DC……………………………………………30V
- Corriente DC…………………………………………5A
- Salida TRIAC………………………………………………………….2
- Tensión salida AC…………………………….……250V
- Corriente AC……………………….……………….12A
- Dimensiones…………………………………….………….100×72.4mm
- Empotrable…………………………………………………Sí
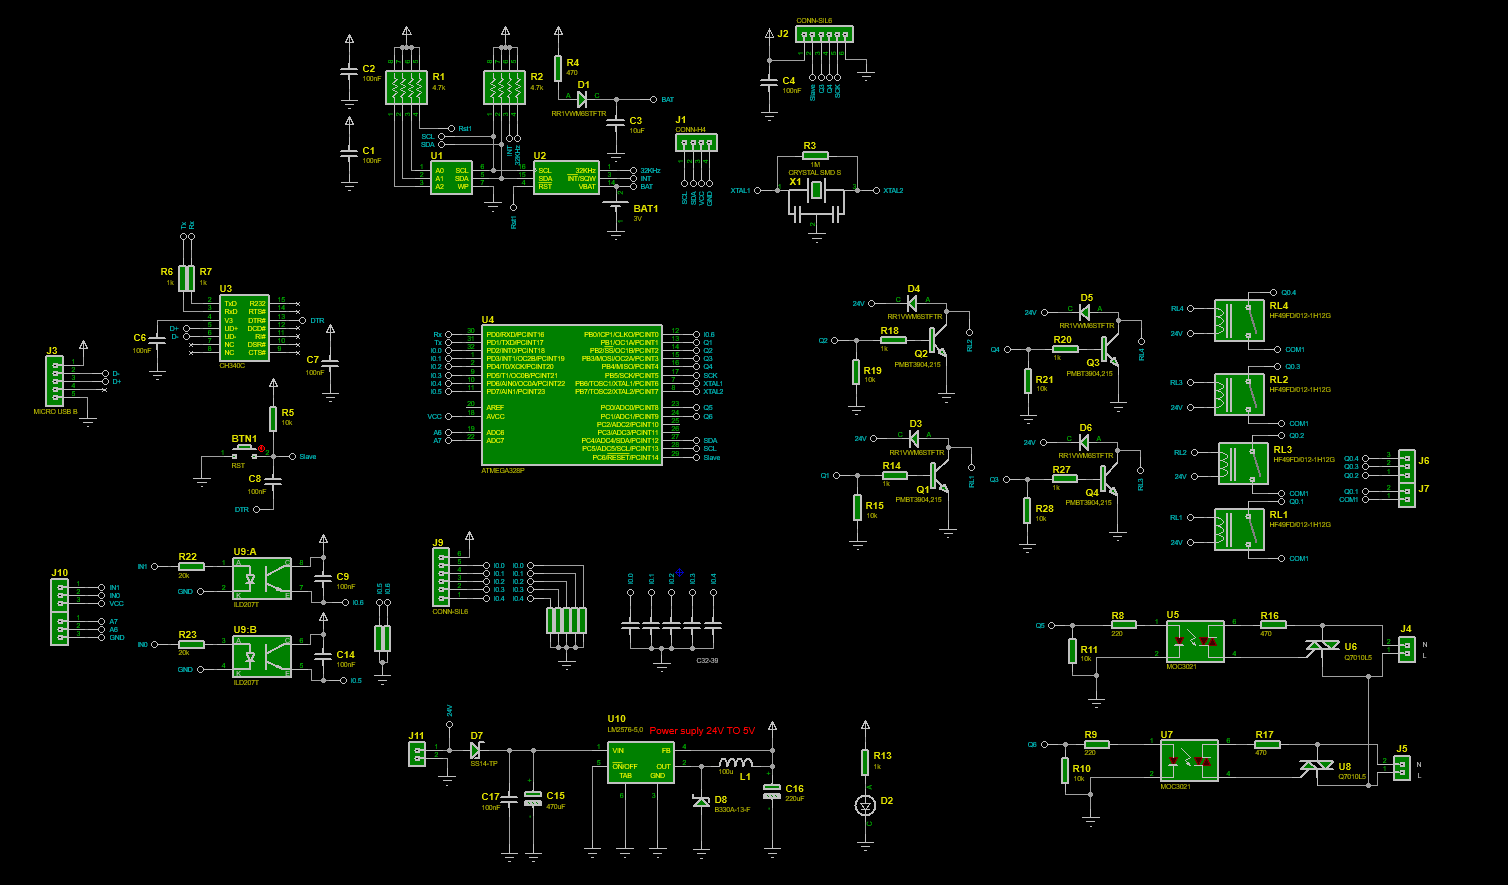

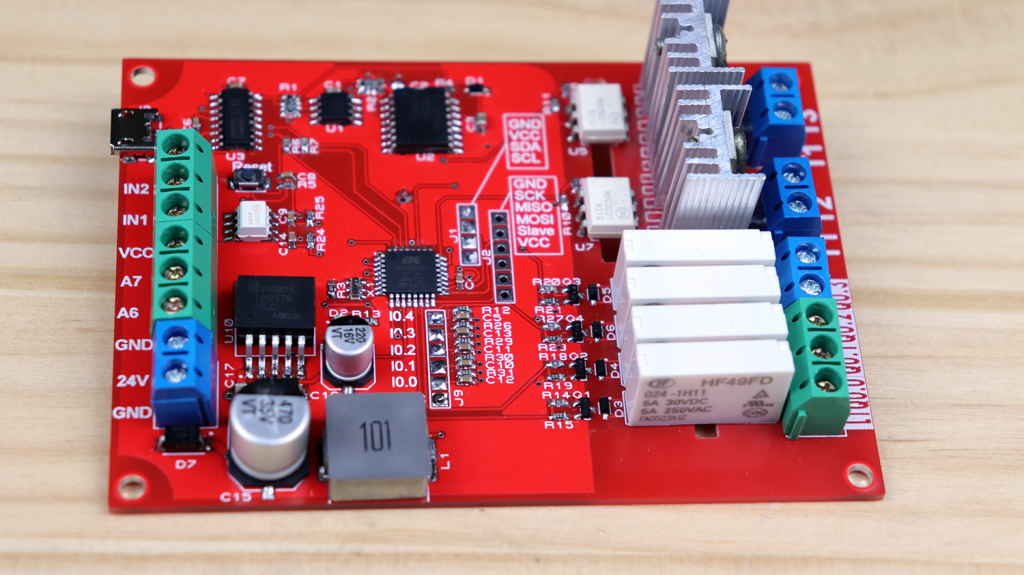
LISTA DE MATERIALES
| Categoría | Cantidad | Referencias | Valor | PCB Package | datasheet |
| Condensadores | 13 | C1,C2,C4,C5,C6,C7,C8,C9,C10,C11,C12,C13,C14 | 100nF | 0603_CAP | (buy & see) |
| Condensadores | 1 | C3 | 10uF | 0805_CAP | (buy & see) |
| Condensadores | 1 | C15 | 470uF | CAP SMD 10.5X10MM ALUMINUM 470UF/35V | (buy & see) |
| Condensadores | 1 | C16 | 220uF | CAP SMD 6.3X7.7MM ALUMINUM 220UF/16V | (buy & see) |
| Condensadores | 1 | C17 | 100nF | 1206_CAP | (buy & see) |
| Resistencias | 2 | R1,R2 | 4.7k | RES_ARRAY 0603X4 | (buy & see) |
| Resistencias | 1 | R3 | 1M | 0603_RES | (buy & see) |
| Resistencias | 1 | R4 | 470 | 0603_RES | (buy & see) |
| Resistencias | 14 | R5,R10,R11,R12,R15,R19,R21,R24,R25,R26,R28,R29,R30,R31 | 10k | 0603_RES | (buy & see) |
| Resistencias | 7 | R6,R7,R13,R14,R18,R20,R27 | 1k | 0603_RES | (buy & see) |
| Resistencias | 2 | R8,R9 | 220 | 0603_RES | (buy & see) |
| Resistencias | 2 | R16,R17 | 470 | 1206_RES | (buy & see) |
| Resistencias | 2 | R22,R23 | 20k | 1206_RES | (buy & see) |
| Integrados | 1 | U1 | AT24C512B | SO8 | (buy & see) |
| Integrados | 1 | U2 | DS3232 | SO16W | (buy & see) |
| Integrados | 1 | U3 | CH340C | SO16 | (buy & see) |
| Integrados | 1 | U4 | ATMEGA328P | QFP80P900X900X120-32 | (buy & see) |
| Integrados | 2 | U5,U7 | MOC3021 | DIL06 | (buy & see) |
| Integrados | 2 | U6,U8 | TRIAC | TO220 | (buy & see) |
| Integrados | 1 | U9 | ILD207T | SO8 | (buy & see) |
| Integrados | 1 | U10 | LM2576-5,0 | TO170P1410X464-6 | (buy & see) |
| Transistores | 4 | Q1,Q2,Q3,Q4 | PMBT3904,215 | SOT23-3 | (buy & see) |
| Diodos | 5 | D1,D3,D4,D5,D6 | RR1VWM6STFTR | SOD2614X116 | (buy & see) |
| Diodos | 1 | D2 | LED-RED | LEDC2012X120 | (buy & see) |
| Diodos | 1 | D7 | SS14-TP | DIOM5226X230N | (buy & see) |
| Diodos | 1 | D8 | B330A-13-F | DIOM5226X230N | (buy & see) |
| Miscelánea | 1 | BAT1 | 3V | BAT 3V | (buy & see) |
| Miscelánea | 1 | BTN1 | RST | BUTTON SMD 2P | (buy & see) |
| Miscelánea | 1 | J1 | CONN-H4 | CONN-SIL4 | (buy & see) |
| Miscelánea | 2 | J2,J9 | CONN-SIL6 | CONN-SIL6 | (buy & see) |
| Miscelánea | 1 | J3 | MICRO USB B | MICRO USB B | (buy & see) |
| Miscelánea | 4 | J4,J5,J7,J11 | TBLOCK-M2 | T-BLOCK 2PIN BLUE | |
| Miscelánea | 3 | J6,J8,J10 | TBLOCK-M3 | T-BLOCK 3PIN BLUE | |
| Miscelánea | 1 | L1 | 100u | INDUCTOR 100UH | (buy & see) |
| Miscelánea | 4 | RL1,RL2,RL3,RL4 | HF49FD/012-1H12G | RELAY24VPLC V1 | (buy & see) |
| Miscelánea | 1 | X1 | CRYSTAL SMD S | OSCILADOR SMD CERAMIC RESONATORS | (buy & see) |
PASOS PARA SUBIR UN PROGRAMA
PASO 1 : SUBIR GESTOR DE ARRANQUE (BOOTLOADER)
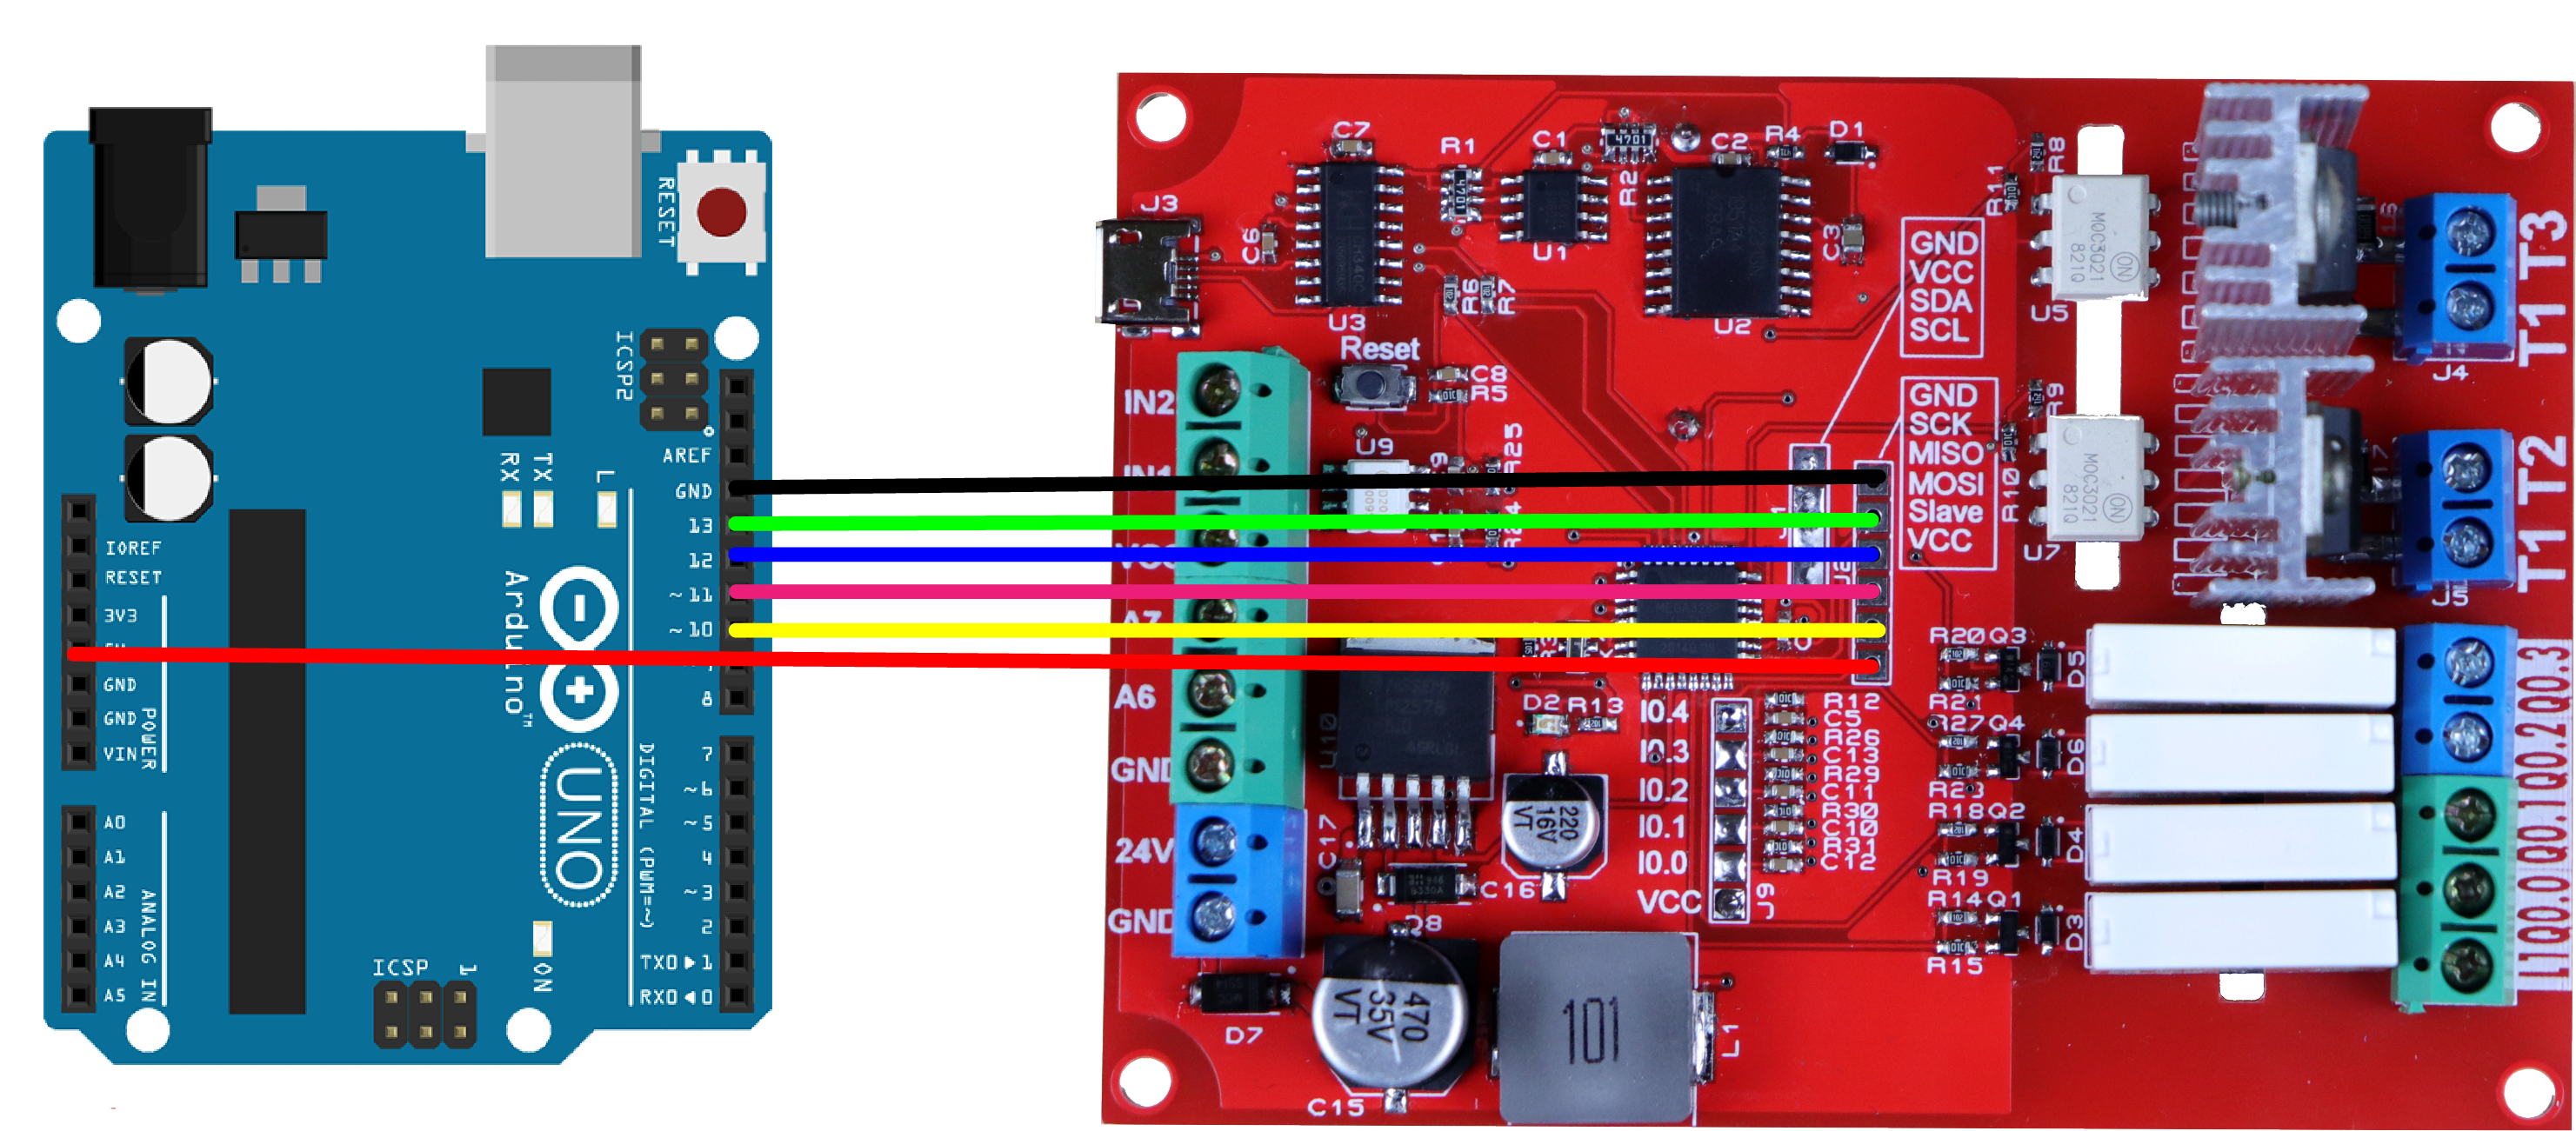
Para poder usar un microcontrolador nuevo (atmega328p-AU), es necesario subir un un gestor de arranque como también llamado “BOOTLOADER”, esto nos facilitará subir programas en futuras ocasiones.
finalmente para quemar el bootloader se tendrá que realizar a través de los pines ISP, que prácticamente serían los pines [ (MOSI=11) (MISO = PIN12) (SCK=PIN13) (Slave=PIN10) ]. Para subir y quemar el gestor de arranque necesitaremos un arduino UNO ó MEGA y realizar las siguientes conexiones (ARDUINO UNO – MAIN BOARD).
PASO 2 : SUBIR PROGRAMA; PC – MAIN BOARD
Después de haber subido el gestor de arranque finalmente ya podremos subir cualquier programa como normalmente lo realizamos a través del puerto serie.
REQUERIMEINTO Y PROPÓSITO DE LA TARJETA
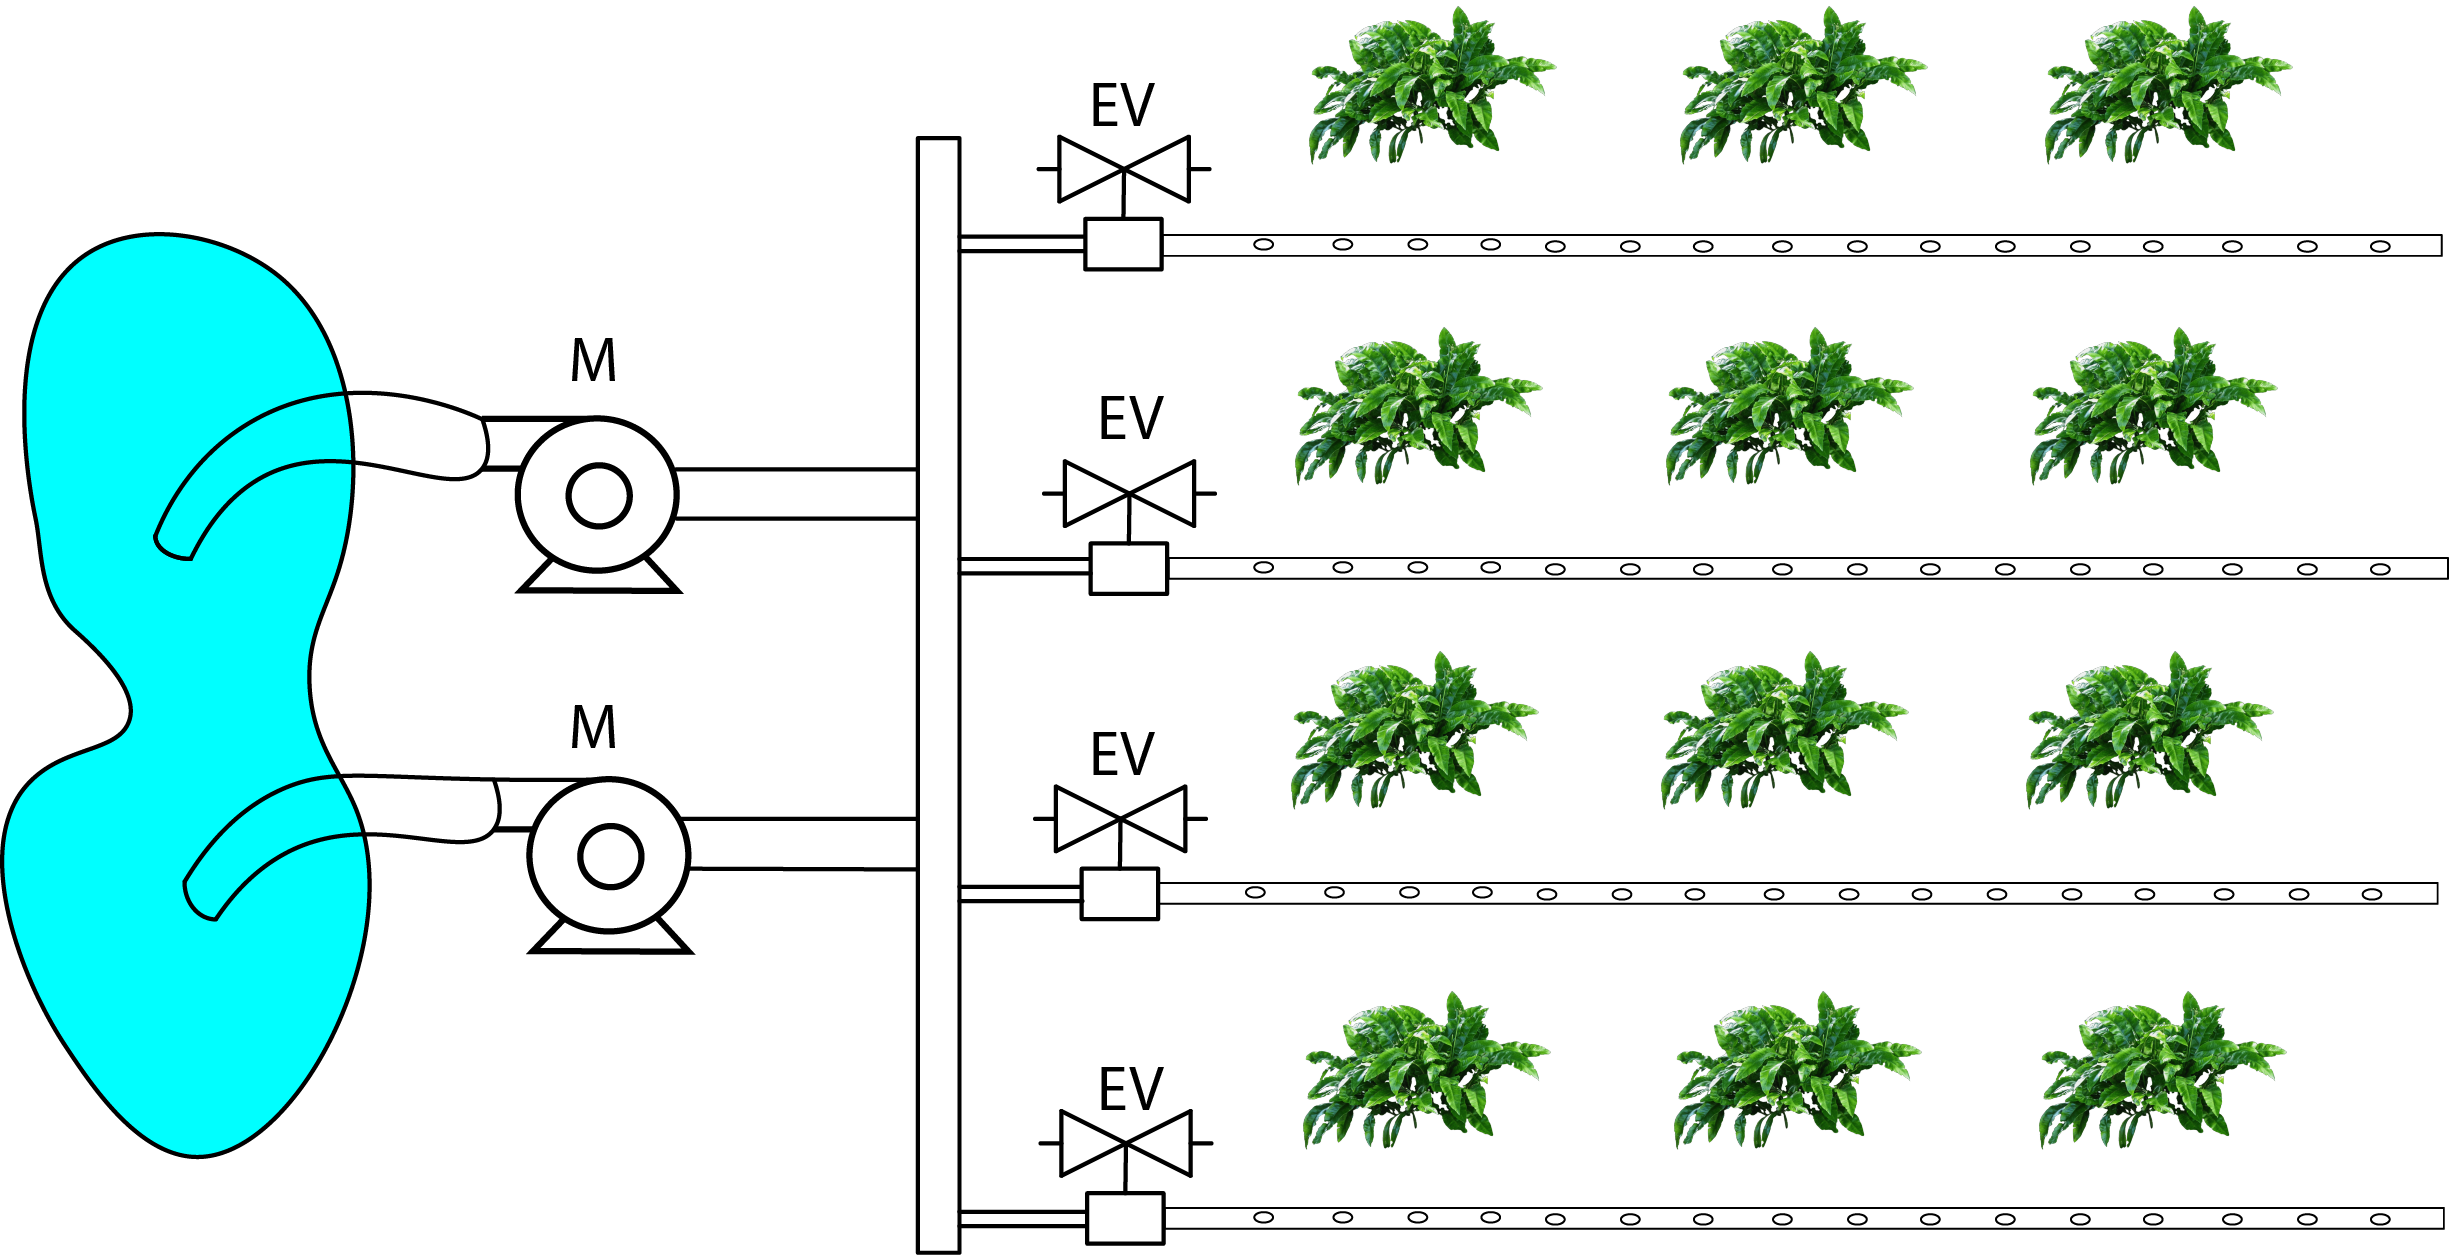
CONEXIONES EXTERNAS

CODIGOS DE PRUEBA
// ELECTROVALVULA 1
//INICIO
int on_off1   = 0;

int dia_1I    = 2;
int hora_1I   = 7;
int minuto_1I = 0;
//FIN
int dia_1F    = 2;
int hora_1F   = 7;
int minuto_1F = 1;

// ELECTROVALVULA 2
// INICIO
int on_off2   = 0;

int dia_2I    = 2;
int hora_2I   = 7;
int minuto_2I = 2;
// FIN
int dia_2F    = 2;
int hora_2F   = 7;
int minuto_2F = 3;

// ELECTROVALVULA 3
//INICIO
int on_off3   = 1;

int dia_3I    = 2;
int hora_3I   = 7;
int minuto_3I = 10;
//FIN
int dia_3F    = 2;
int hora_3F   = 7;
int minuto_3F = 11;

// ELECTROVALVULA 4
//INICIO
int on_off4   = 1;

int dia_4I    = 2;
int hora_4I   = 7;
int minuto_4I = 12;
//FIN
int dia_4F    = 2;
int hora_4F   = 7;
int minuto_4F = 13;

#include <Wire.h>
#include "Sodaq_DS3231.h"
#include <LiquidCrystal_I2C.h> // Debe descargar la Libreria que controla el I2C
LiquidCrystal_I2C lcd(0x27, 16, 2);
char DiaSemana[][4] = { "Dom", "Lun", "Mar", "Mie", "Jue", "Vie", "Sab" };
// La linea fija la fecha, hora y dia de la semana, se debe suprimir la linea en la segunda carga
// Ejemplo 2017 diciembre 06, 22:00:00  dia 1-Lunes (0=Dom, 1=Lun, 2=Mar, 3=Mie, 4=Jue, 5=Vie, 6=Sab)
//DateTime dt(2021, 01, 17, 16, 42, 40, 0);
const int leftt = 2;
const int rightt = 3;
const int okk = 4;
const int bottomm = 5;
const int topp = 6;
const int in11 = 7;

const int q1 = 9;
const int q2 = 10;
const int q3 = 11;
const int q4 = 12;
const int q5 = 15;
const int q6 = 14;

void setup() {
  Wire.begin();
  rtc.begin();
  lcd.init();
  lcd.backlight();
  lcd.clear();
  // La linea fija la fecha, hora y dia de la semana, se debe suprimir la linea en la segunda carga
  //rtc.setDateTime(dt);
  pinMode(leftt, INPUT);
  pinMode(rightt, INPUT);
  pinMode(okk, INPUT);
  pinMode(bottomm, INPUT);
  pinMode(topp, INPUT);
  pinMode(in11, INPUT);

  pinMode(q1, OUTPUT);
  pinMode(q2, OUTPUT);
  pinMode(q3, OUTPUT);
  pinMode(q4, OUTPUT);
  pinMode(q5, OUTPUT);
  pinMode(q6, OUTPUT);

}
void loop()
{
int segundo_I = 0;
int segundo_F = 0;
  DateTime now = rtc.now();
  lcd.setCursor(1, 1);
  lcd.print(now.date(), DEC);
  lcd.print('/');
  lcd.print(now.month(), DEC);
  lcd.print(' ');
  lcd.print(now.hour(), DEC);
  lcd.print(':');
  lcd.print(now.minute(), DEC);
  lcd.print(':');
  lcd.print(now.second(), DEC);
  lcd.print(' ');
  lcd.print(DiaSemana[now.dayOfWeek()]);

  // ELECTROVALVULA 1
  if (on_off1 == 1) {
    if (now.dayOfWeek() == dia_1I && now.hour() == hora_1I && now.minute() == minuto_1I ) {
      digitalWrite(q1, 1);
      digitalWrite(q6, 1);
      digitalWrite(q5, 1);
    }
  }
  if ((now.dayOfWeek() == dia_1F && now.hour() == hora_1F && now.minute() == minuto_1F)) {
    digitalWrite(q1, 0);
    digitalWrite(q6, 0);
    digitalWrite(q5, 0);
  }

  // ELECTROVALVULA 2
  if (on_off2 == 1) {
    if (now.dayOfWeek() == dia_2I && now.hour() == hora_2I && now.minute() == minuto_2I) {
      digitalWrite(q2, 1);
      digitalWrite(q6, 1);
      digitalWrite(q5, 1);
    }
  }
  if ((now.dayOfWeek() == dia_2F && now.hour() == hora_2F && now.minute() == minuto_2F)) {
    digitalWrite(q2, 0);
    digitalWrite(q6, 0);
    digitalWrite(q5, 0);
  }
  // ELECTROVALVULA 3
  if (on_off3 == 1) {
    if (now.dayOfWeek() == dia_3I && now.hour() == hora_3I && now.minute() == minuto_3I) {
      digitalWrite(q3, 1);
      digitalWrite(q6, 1);
      digitalWrite(q5, 1);
    }
  }
  if ((now.dayOfWeek() == dia_3F && now.hour() == hora_3F && now.minute() == minuto_3F)) {
    digitalWrite(q3, 0);
    digitalWrite(q6, 0);
    digitalWrite(q5, 0);
  }

  // ELECTROVALVULA 4
  if (on_off4 == 1) {
    if (now.dayOfWeek() == dia_4I && now.hour() == hora_4I && now.minute() == minuto_4I) {
      digitalWrite(q4, 1);
      digitalWrite(q6, 1);
      digitalWrite(q5, 1);
    }
  }
  if ((now.dayOfWeek() == dia_4F && now.hour() == hora_4F && now.minute() == minuto_4F)) {
    digitalWrite(q4, 0);
    digitalWrite(q6, 0);
    digitalWrite(q5, 0);
  }

  if (on_off1 == 0 || on_off2 == 0 || on_off3 == 0 || on_off4 == 0) {
    if(on_off1 == 1 && on_off2 == 1 && on_off3 == 1 && on_off4 == 1){
    digitalWrite(q6, 0);
    digitalWrite(q5, 0);
  }
  }
}