

INTRODUCCIÓN

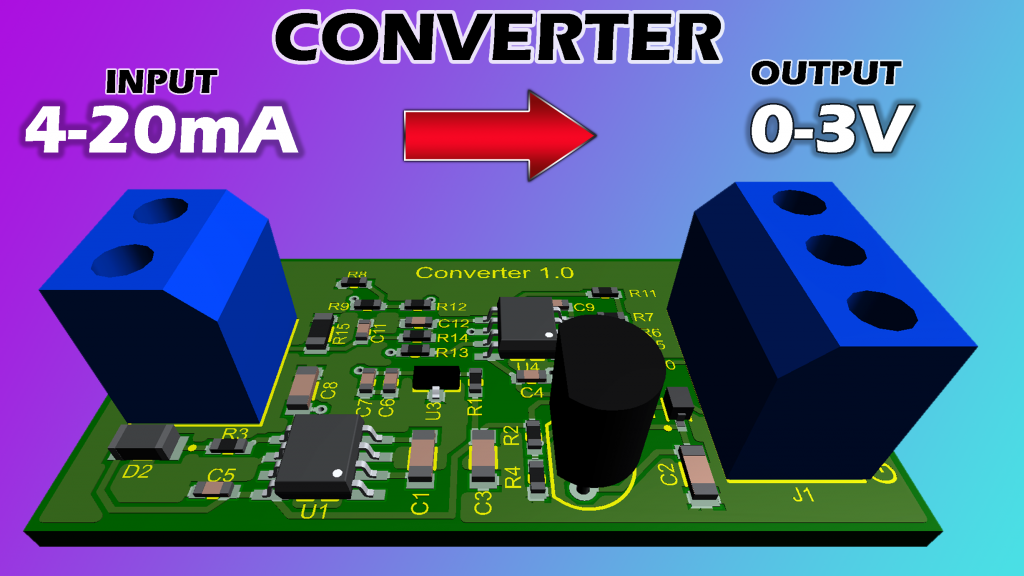
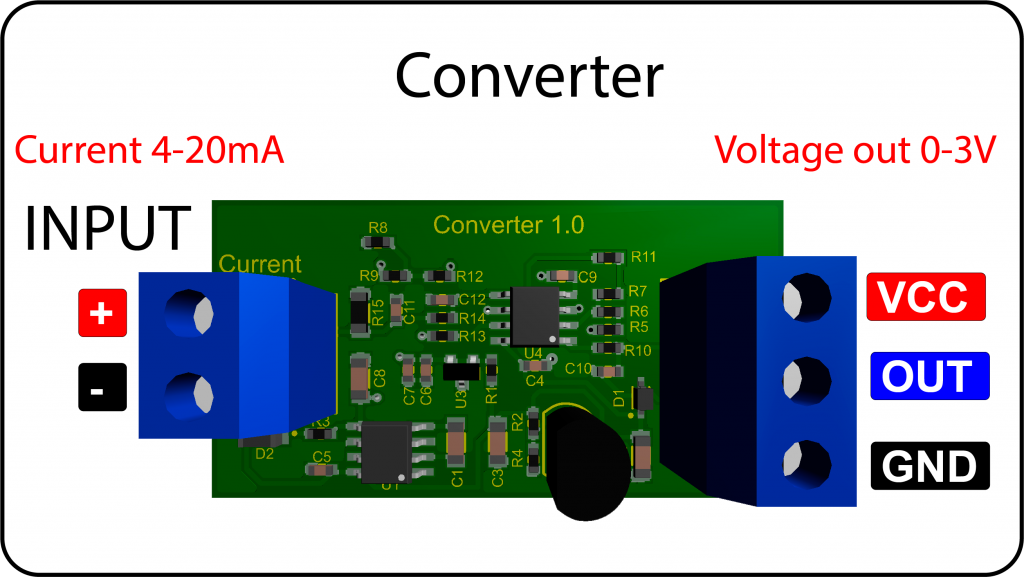
Desde hace mucho tiempo estuve desarrollando un circuito que sea capaz de convertir señales de corriente variable de 4-20mA a una salida de voltaje variable para poder trabajar con microcontroladores o con dispositivos de nivel TTL. Cabe mencionar que este proyecto es muy útil para aplicaciones de la industria. Aparte de ello, este circuito será integrado en las placas de PLC que venimos desarrollando. Es decir, para la próxima versión ya tendremos entradas de corriente (4-20mA). Efectivamente ya tenemos concluido el proyecto, así que en este episodio aprenderemos a como realizar el circuito y también la creación de la tarjeta PCB.
ESPECIFICACIONES TÉCNICAS

- Tensión de alimentación……………………….…………5VDC
- Corriente de alimentación………………….……………80mA
- Tensión de entrada(recomendado)…………………24VDC
- Corriente de entrada………………………………………0-30mA

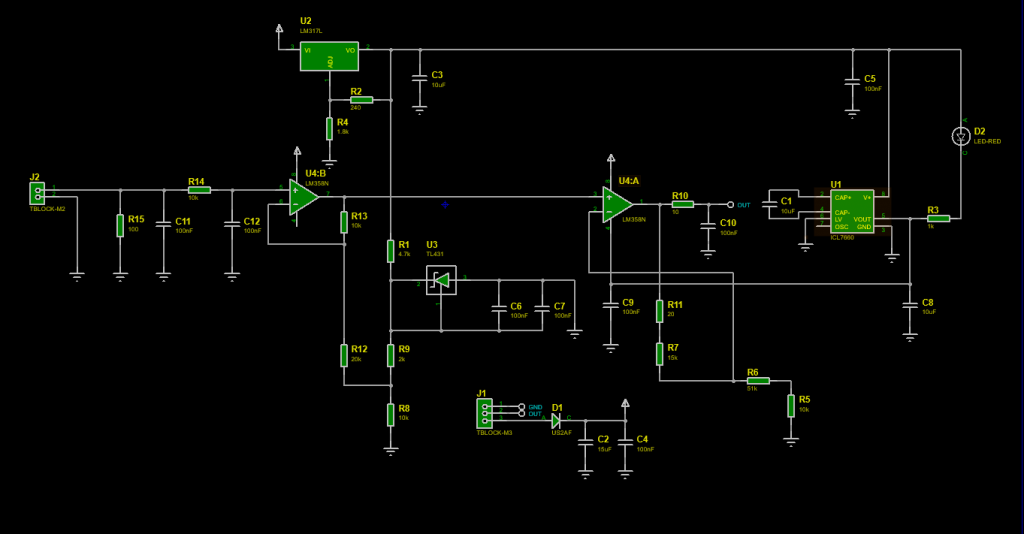

LISTA DE MATERIALES
| Categoría | Cantidad | Referencias | Valor | PCB Package | Datasheet |
| Condensadores | 4 | C1,C2,C3,C8 | 10uF | 1206_CAP | see & buy |
| Condensadores | 8 | C4,C5,C6,C7,C9,C10,C11,C12 | 100nF | 0603_CAP | see & buy |
| Resistencias | 1 | R1 | 4.7k | 0603_RES | see & buy |
| Resistencias | 1 | R2 | 240 | 0603_RES | see & buy |
| Resistencias | 1 | R3 | 1k | 0603_RES | see & buy |
| Resistencias | 1 | R4 | 1.8k | 0603_RES | see & buy |
| Resistencias | 4 | R5,R8,R13,R14 | 10k | 0603_RES | see & buy |
| Resistencias | 1 | R6 | 51k | 0603_RES | see & buy |
| Resistencias | 1 | R7 | 15k | 0603_RES | see & buy |
| Resistencias | 1 | R9 | 2k | 0603_RES | see & buy |
| Resistencias | 1 | R10 | 10 | 0603_RES | see & buy |
| Resistencias | 1 | R11 | 20 | 0603_RES | see & buy |
| Resistencias | 1 | R12 | 20k | 0603_RES | see & buy |
| Resistencias | 1 | R15 | 100 | 1206_RES | see & buy |
| Integrados | 1 | U1 | ICL7660 | SO8 | see & buy |
| Integrados | 1 | U2 | LM317L | TO92 | see & buy |
| Integrados | 1 | U3 | TL431 | SOT23-3 | see & buy |
| Integrados | 1 | U4 | LM358N | SO8 | see & buy |
| Diodos | 1 | D1 | RR1.. | SOD2614X116 | see & buy |
| Diodos | 1 | D2 | LED-RED | LEDC3216X110 | see & buy |
| Miscelánea | 1 | J1 | TBLOCK-M3 | T-BLOCK 3PIN BLUE | |
| Miscelánea | 1 | J2 | TBLOCK-M2 | T-BLOCK 2PIN BLUE |
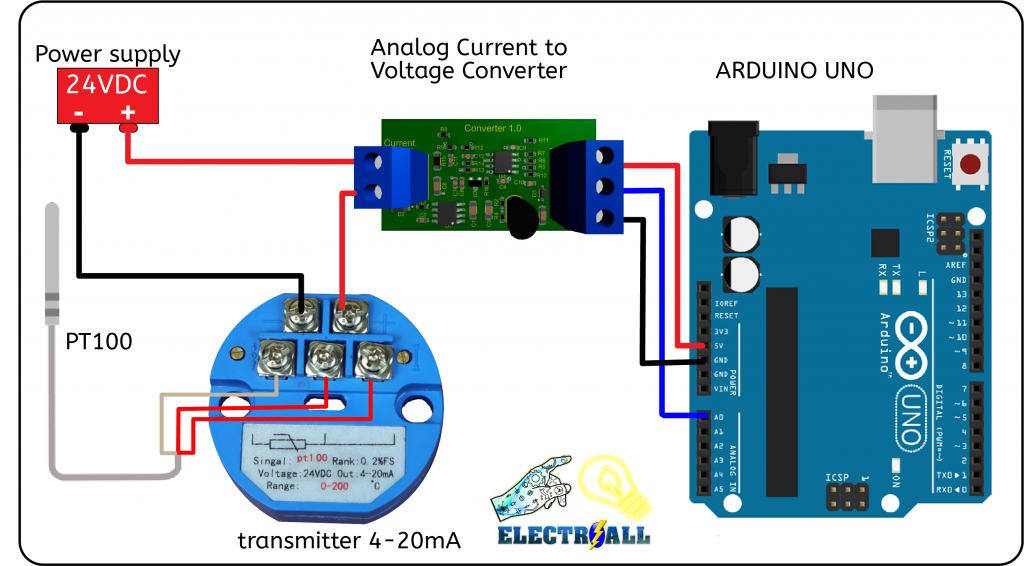
CONEXIONES EXTERNAS

CONEXIONES ARDUINO – CONVERSOR

CONEXIONES ARDUINO – CONVERSOR con Amperímetro
CÓDIGO ARDUINO
#define CurrentSensorPin  A0
#define VREF 5000 // ADC's reference voltage on your Arduino,typical value:5000mV

unsigned int voltage; //unit:mV
float current;  //unit:mA

void setup()
{
   Serial.begin(115200);
   pinMode(13,OUTPUT);
}

void loop()
{
    voltage = analogRead(CurrentSensorPin)/1024.0*VREF;
    Serial.print("voltage:");
    Serial.print(voltage);
    Serial.print("mV  ");
    current = voltage/100.0;  //Sense Resistor:100ohm
    Serial.print("current:");
    Serial.print(current);
    Serial.println("mA");
    delay(1000);

if(voltage>=2000){
  digitalWrite(13,1);
}
else{
  digitalWrite(13,0);
}

}

2 comentarios. Dejar nuevo
Hola, yo había visto antes que para pasar el valor de corriente a voltaje, colocaban una resistencia de 250 ohm en serie, para que, por ley de ohm, el voltaje se vuelva variable entre 0-5V.
Cual es la ventaja de tener un circuito como este?
O cual es la desventaja de tener solamente una resistencia que esté variando el voltaje?
Muy bueno el circuito, hace tiempo que tenia la duda de como hacer algo como esto, gracias.
Me parece un circuito muy útil, pero también seria muy útil disponer una placa con varias entradas y salidas (5, 10. 15…) y de esta manera evitar tener varias tarjetas individuales en un mismo proyecto y poder ahorrar en elementos comunes.
¿Podrías indicar como seria el esquema eléctrico de una tarjeta con 10 entradas?
Gracias.